Windows Terminal and PowerShell Configuration Guide
Background
For the longest time, Windows had the old program known as just “Command Prompt” or “cmd.exe”. A simple window with black background and white text, and very limited in features and ergonomics. Eventually they developed PowerShell, it was a big upgrade in terms of scripting capabilities, but only a minor improvement to the terminal and user experience.
There was never a clear distinction between shell and terminal, as there is on Unix-like systems. And there were still major limitations in ergonomics, compared to state of the art on Unix-like systems. There have been some interesting third party programs that have tried to fill the gap. But ultimately, the overall story around terminals and shells has always been quite bad on Windows.
In Windows 10 and 11 there has finally been some major improvements. There is the new program Windows Terminal, which is modern, feature rich, fast, and configurable. PowerShell is being being updated a lot, and there is WSL which is a great way to run Linux on Windows.
Check out this article series about Windows Command-Line history for some very interesting and nerdy facts and pictures.
Windows Terminal
Windows Terminal is really good. It has a lot of good features, and good performance. It is a massive step up from previous terminal programs. Using this is a no-brainer, anyone doing anything on the command line on Windows should be using this program.
It is installed by default on Windows 11, and on Windows 10 it can be downloaded from the Microsoft Store.
Alternatives
Windows Terminal is really good, but it is not perfect. My biggest gripe is that it does not support vertical tabs.
There are other alternatives, that offer some interesting competition. However, they all come with other trade-offs, and Windows Terminal is still the winner for me personally. For example, Tabby has vertical tabs, which is nice, but it has worse performance and compatibility than Windows Terminal, which is less nice.
Anyway, here is a list of alternative terminal programs, in no particular order:
Tabby, Wave Term, Ghostty, Contour Terminal, Fluent Terminal, Hyper, WezTerm, Alacritty, Cmder, ConEmu.
Windows Terminal configuration
Some settings are applied on the program level, and some settings are applied on the profile level. The profile level settings can be applied either as profile defaults, or they can be applied to individual profiles.
There are two settings files, the default settings file and the settings file.
These files are merged together,
so for example, if the settings file defines color schemes in schemes,
then it gets added to the list of color schemes
defined in schemes in the default settings file.
There is a settings GUI inside the app, which controls the settings file. However, this GUI does not contain all possible settings. Some settings can only be changed by editing the settings JSON file manually.
To open the settings GUI, press the Ctrl+, keyboard shortcut,
or click the down-arrow in the window top bar and click on Settings.
To open the settings JSON file, press the Ctrl+Shift+, keyboard shortcut,
it should open some text editor, probably VS Code, showing a JSON file.
It is also possible to access these interfaces via the Command Palette.
Press Ctrl+Shift+p to open the Command Palette, and search for “settings”.
This also shows which keyboard shortcut can be used to access various interfaces.
See the Windows Terminal documentation for more info.
Install and use another font
There are plenty of good fonts to choose from. My current favorite is Hack.
If you want to use some kind of powerline prompt, such as Starship or Oh My Posh, then you need a modified version of the font that includes Powerline characters. The standard place to get those fonts from is Nerd Fonts. But even if you don’t want to use any powerline prompt, it doesn’t hurt to get the font from Nerd Fonts anyway.
Once the font file (which usually has extension .ttf) is downloaded,
navigate to the file in File Explorer, and right click it and select Install.
It will then installed system wide, and will be available in all programs.
The font is configued in Windows Terminal at the profile level, under Appearance. It can be done either via the settings GUI or via the settings JSON file.
Default color schemes
The built in color scheme are ok, but not great.
The default scheme for WSL has a purple background, which has poor contrast against blue text. This is an odd decision, since blue text can occur quite frequently in Linux shell output. So I definitely recommend changing the color scheme for WSL to something with a more normal background color.
To test the terminal colors on WSL, use the colortest program, and to test it in Powershell, use a script like this one
Setting the preferred color scheme is done at the profile level, either via the settings GUI or the settings JSON file.
Adding new color schemes
Color schemes can be found in many places. One good collection is the base16 schemes. My personal favorite is the one called Eighties.
Adding new color schemes is done under schemes at the top level in the settings JSON file.
This item should be a list of objects, where each object is a color scheme.
Adding new application themes
Application theme can be changed at Appearance -> Application Theme
at the program level in the settings GUI,
or with the theme setting in the settings JSON file.
It is possible to define custom application themes,
under themes at the top level in the settings file.
This should be a list of objects, where each object is a theme.
Hide the tab close button
This can only be done via the settings JSON file, not via the settings GUI.
In the application theme, showCloseButton can be set to never or hover or activeOnly,
to hide the button to varying degrees.
Changing tab colors
By default, the contrast between the focused and unfocused tabs is quite low, especially when using a dark color scheme. This can be improved in two different ways, depending on personal preference.
This can only be done via the settings JSON file, not via the settings GUI.
In the application theme, in the tab object, background and unfocusedBackground is used to define the background color for focused and unfocused tabs.
In the profile settings, there is the tabColor setting.
This only provides the possibility to define a single color,
which is automatically converted by the program
into two different shades for focused and unfocused.
This setting overrides the background defined in the application theme.
This setting can be defined either in the profile defaults,
or it can be defined in individual profiles,
in which case it only overrides the color for tabs of that profile.
See Github - Windows Terminal - Issue #771 and Github - Windows Terminal - Issue #1337 for more info.
Changing the order of profiles
This can only be done via the settings JSON file, not via the settings GUI.
In the settings JSON file,
in profiles -> list, move the items to the desired order.
See Github - Windows Terminal - Issue #8914 for more info.
Vertical tabs
There is currently no support for vertical tabs.
See Github - Windows Terminal - Issue #835 for more info.
Example
Here is an example of a Windows Terminal settings JSON file.
{
  // ... other items ...
  "profiles":
    {
        "defaults":
        {
            "antialiasingMode": "cleartype",
            "colorScheme": "Eighties",
            "cursorShape": "bar",
            "font":
            {
                "face": "Hack Nerd Font Mono",
                "size": 11
            }
        },
        "list":
        [
            {
                "commandline": "C:\\Program Files\\PowerShell\\7\\pwsh.exe -NoLogo",
                "guid": "{574e775e-4f2a-5b96-ac1e-a2962a402336}",
                "hidden": false,
                "name": "PowerShell",
                "source": "Windows.Terminal.PowershellCore"
            },
            {
                "commandline": "%SystemRoot%\\System32\\WindowsPowerShell\\v1.0\\powershell.exe -NoLogo",
                "guid": "{61c54bbd-c2c6-5271-96e7-009a87ff44bf}",
                "hidden": false,
                "name": "Windows PowerShell"
            },
            {
                "guid": "{51855cb2-8cce-5362-8f54-464b92b32386}",
                "hidden": false,
                "name": "Ubuntu",
                "source": "CanonicalGroupLimited.Ubuntu_79rhkp1fndgsc"
            },
            {
                "guid": "{0caa0dad-35be-5f56-a8ff-afceeeaa6101}",
                "hidden": false,
                "name": "Command Prompt"
            },
            {
                "guid": "{b453ae62-4e3d-5e58-b989-0a998ec441b8}",
                "hidden": false,
                "name": "Azure Cloud Shell",
                "source": "Windows.Terminal.Azure"
            }
        ]
    },
    "schemes":
    [
        {
            "background": "#2D2D2D",
            "black": "#2D2D2D",
            "blue": "#6699CC",
            "brightBlack": "#747369",
            "brightBlue": "#6699CC",
            "brightCyan": "#66CCCC",
            "brightGreen": "#99CC99",
            "brightPurple": "#CC99CC",
            "brightRed": "#F2777A",
            "brightWhite": "#F2F0EC",
            "brightYellow": "#FFCC66",
            "cursorColor": "#D3D0C8",
            "cyan": "#66CCCC",
            "foreground": "#D3D0C8",
            "green": "#99CC99",
            "name": "Eighties",
            "purple": "#CC99CC",
            "red": "#F2777A",
            "selectionBackground": "#515151",
            "white": "#D3D0C8",
            "yellow": "#FFCC66"
        }
    ],
    "theme": "Custom",
    "themes":
    [
        {
            "name": "Custom",
            "tab":
            {
                "background": "terminalBackground",
                "iconStyle": "default",
                "showCloseButton": "never",
                "unfocusedBackground": "#1D1D1DFF"
            }
        }
    ]
}
PowerShell Versions and Editions
PowerShell has two different Editions. Desktop edition is older, and Core edition is newer. Overall, they are not vastly different products, they have the same general goals and scope. However, there are significant differences in the PowerShell language itself.
PowerShell Desktop edition version 5.1 is the default on Windows 11. It is very mature and stable, and works fine. It is currently in maintenance mode, and will not get any new versions or features.
PowerShell Core edition is a newer thing, it does not come installed by default on Windows 10 or 11. It has already had two new major versions, version 6 and version 7, and it is being actively developed. It contains plenty of new features, and it aims to be backwards compatible with PowerShell 5.1, but it is not fully compatible yet. It is also cross-platform, it is available for Windows, Linux, and MacOS, which seems to generate some amount of shock in some people.
Read more about the differences between these versions at Differences between Windows PowerShell 5.1 and PowerShell 7.x and Migrating from Windows PowerShell 5.1 to PowerShell 7.
Recommended PowerShell version
For someone who is an IT professional,
it would probably be recommended to install the latest version of PowerShell Core.
For someone who is a beginner, or casual user,
it should be fine to remain on PowerShell Desktop 5.1, for the time being.
I am using Windows 11 with PowerShell Core 7.5.
However, this article is useful for people running PowerShell Desktop 5.1 as well.
Checking current PowerShell version
To check which version is currently running, use this command.
echo $PSVersionTableInstalling PowerShell Core
To install a newer version of PowerShell, follow the Installing PowerShell on Windows documentation for the latest version. The Winget method is probably the simplest and most developer friendly method.
PowerShell Core edition is designed to coexist with PowerShell Desktop edition. It has a separate installation path, program name, icon, module path, profile path, etc.
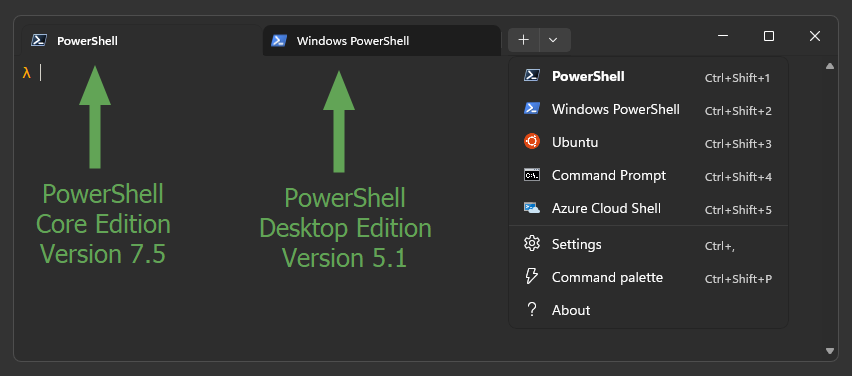
When installed, it is added to the Start Menu with the name PowerShell 7,
and it is added to Windows Terminal as a profile with the name PowerShell,
and it has an icon that is a bit darker than the older version.
PowerShell configuration
Shell scripting is a large and complex topic. This sections is a “how I do it”, not an “ultimate guide to everything you need to know”.
See the page about_PowerShell_exe for a list of all command line options. When trying to open other versions of that page, such as 7.5, it redirects to the 5.1 version. I assume that means that the CLI has not changed at all between these versions.
Disable the logo
By default, PowerShell prints out somewhere around
one to five lines of text every time it starts.
To disable this, add the -NoLogo parameter to the executable.
This applies to both Desktop and Core editions.
This is configured at the profile level in the Windows Terminal settings.
The setting is called Command line in the GUI,
and commandline in the settings JSON file.
PowerShell profile
Each Windows user has their own profile file,
where they can add their personal customization,
by editing the file with a code editor.
It is a PowerShell script file that is loaded automatically every time PowerShell starts
(unless it is started with the -NoProfile command line option).
Profile path
To get the current path to the profile script file, use this command.
echo $PROFILEFor PowerShell Desktop 5.1, it should be this.
C:\Users\Username\Documents\WindowsPowerShell\Microsoft.PowerShell_profile.ps1For PowerShell Core 7.5, it should be this.
C:\Users\Username\Documents\PowerShell\Microsoft.PowerShell_profile.ps1Editing mode
Powershell supports different editing modes.
For users with a Unix background,
it may be desirable to switch to the Emacs editing mode.
This changes various keyboard shortcuts.
For example, Ctrl+d will exit the session,
and Ctrl+a and Ctrl+e will move the cursors to the beginning and end of the line.
Read more about -EditMode and other parameters
at Set-PSReadLineOption.
To use the Emacs edit mode, add this to your PowerShell profile.
Set-PSReadlineOption -EditMode EmacsKeyboard shortcuts
It is possible to add custom keyboard shortcuts.
For example, if you want to be able to exit the shell session by pressing Ctrl+d,
without switching to the Emacs editing mode,
then add the following to your PowerShell profile.
Set-PSReadlineKeyHandler -Key Ctrl+d -Function ViExitAliases
An alias is a simple mapping between one command and another.
For example, to make g be an alias to git,
add the following to your PowerShell profile.
Set-Alias -Name g -Value gitIt is also possible to create functions, to perform more complex tasks. Functions can be called just like commands, by typing them as input in the shell prompt.
For example, to create a function that is similar to pwd,
but only outputs the actual path, and not the unnecessary fluff around it,
add the following to your PowerShell profile.
function p {
  Write-Output "$(Get-Location)"
}
Custom prompt
To customize the leading characters that are printed on every input prompt,
define the prompt function in your PowerShell profile.
For example, this code will set the prompt to be a single > character.
function prompt {
  ">"
}
Here is a more advanced example, that uses Console control characters and 24 bit color. See also Powershell Special Characters.
function prompt {
  function esc($params) {
    [char]27 + "[" + $params + "m"
  }

  $(esc "38;5;214") + ">" + $(esc "0") + " "
}
The esc function creates an escape character sequence.
The first call to esc sets the color to some shade of orange. 38 means that it “Applies extended color value to the foreground”. 5 means that the next value is an index from the 88 or 256 color table. 214 is the desired color in the 256 color table.
This color is applied to the > character.
The second call to esc uses 0 to reset all attributes back to default state,
so that all text that comes after is unaffected.
Unicode / UTF-8
With PowerShell Core 7.5, Unicode works well out of the box.
With PowerShell Desktop 5.1, Unicode is not enabled by default, and there are two things required to make it work.
See this StackOverflow answer and this StackOverflow answer and $OutputEncoding in PowerShell 5.1 for more info.
Enable unicode support in the system locale in Windows at: Settings -> Time & language -> Language & Region -> Administrative language settings -> Administrative -> Change system locale -> Beta: Use Unicode UTF-8 for worldwide language support.
Add the following to the PowerShell profile
$OutputEncoding = [Console]::InputEncoding = [Console]::OutputEncoding = New-Object System.Text.UTF8Encoding